Thursday, August 4, 2011

Birthday Cake for Me

Adam and his girlfriend, Katie, came down the other night with a birthday cake for me. Oh, it was 10 days AFTER my birthday, but I am the QUEEN of Late Gifts myself, LOL! It took me by surprise to the point that I "puddled up" a bit...aren't I the one who's supposed to be doing stuff like that for others? What's with this "somebody doing stuff for ME" thing?

Umm, here's the cake. Umm...ok, so it's a HALF a cake. No, Katie didn't just bring me a half a cake...some peeps have been munching on the cake (who would that be?). But when they brought it down, I was so stunned, I didn't think to take a picture right away.


SO out-of-the-blue it was...it rocked me to my core! It also made me think that the old saw "It's better to give than to receive" goes both ways - sometimes you've just got to receive so that someone ELSE can give ;-) But, having said that...I immediately pondered how I could get back at Katie, LOL! I decided she needed some reusable grocery bags. Her favorite color is green, and I'd recently tried Keyka Lou's Grocery Bag pattern, so decided to make her a couple of those. I love this pattern, and the only change I made was to add a hanging loop in the middle of one side at the top. This was Ben's idea so that it would fit over that little pokey-outey peg on the grocery store bag holder thingie at the checkstands (technical terms, I'm sure).

Of course I didn't have anything suitable in my stash (IS MY NOSE POKING RIGHT OUT OF THE COMPUTER SCREEN INTO YOUR EYE?), so I zipped off to one of my LQSs, Bayside Quilting, and got these lovely green batiks and a green dot. Since they are lined, these bags take a LOT of fabric, so they are definitely in the GIFT category, rather than the money-making category (unless you have some fabric that was on sale to the point it was almost free). About $15-$17 apiece if using LQS cotton quilting fabrics since it takes 1 1/2 yards per bag at the going rate of $9.49 to $11.49-ish per yard (of course it would be less using JoAnn's or similar fabric). But since I don't sell my stuff, that's ok with me. Also, the fact that the pattern is an instant download pdf is a real bonus - no waiting for the mail!
The colors aren't quite so garrish in person - believe me!
A couple people have commented that the fabric below looks like The Matrix movie!
Thank you Katie for the wonderful cake! You are such a sweetie :-) And I hope you enjoy your bags :-)  

Friday, July 22, 2011

Hot & Spicy Marinated Grilled Flank Steak

I know most of my mid-west bloggie friends just wanna keep cool...but this Hot & Spicy recipe can either be broiled OR grilled, so a nice, chilly marinate in the fridge and then get some burly guy to toss it on the grill - no hot kitchen to deal with! I usually use flank steak for this recipe, but it's great for other cuts as well and you can keep it in the fridge for up to three days. We can never wait more than a few hours though ;-)

Hot & Spicy Marinated Grilled Flank Steak


1/4 cup olive or vegetable oil (I use olive oil)
2 Tablespoons red wine vinegar
2 Tablespoons dry Sherry
2 Tablespoons soy sauce (I use the less sodium kind)
2 Tablespoons packed brown sugar
2 Teaspoons seasoned salt (Lowry's, Johnny's Dock, etc.)
2 Teaspoons dried red pepper flakes (or to your taste)
1 Teaspoon worcestershire sauce
1 Teaspoon paprika
1 Teaspoon chili powder
1/2 Teaspoon garlic powder with parsley
Steaks - flank steak, ribeyes, New Yorks, etc. (I've used all of these at some time)

In a one gallon zip-loc bag, combine all ingredients except steaks. Moosh & slosh around (kitchen technical terms) to mix well. Add steak and seal bag, squeezing out excess air. I usually use a flank steak pack from Costco which has two fairly large steaks, or three smaller ones. If you have a LOT of meat, you may need to increase the amount of marinade, but as long as all the meat gets "wet," you can make the marinade go a long ways. Flop the bag around to ensure the marinade completely covers all sides of the meat. Refrigerate several hours, or up to three days. Remove meat from bag and discard marinade. Grill or broil to desired doneness. If using flank steak, cut crosswise into thin strips. Enjoy!!!

Sunday, July 17, 2011

A Mind Is A Terrible Thing To Let Wander...Or Is It?

Warning: Slightly X-Rated Post

Do we know really know what happens when we let our minds out to wander? Where do they go? And more importantly, why do they come back full of such weird stuff?
It happened to me yesterday. I mentally nodded off for just a split second and my mind grabbed the opportunity and rocketed out the doggie door for parts unknown. About 20 minutes later, it swaggered back, smug and sassy and barking orders: "Go ask the kids for condoms!" Yep...I said CONDOMS. Unable to muster the wit and wherewithal to ask why, I crept down the hall and knocked on their door. This would be my son and daughter-in-law, Ben and Autumn, who moved in with us about five months ago.

Ben and Autumn at The Farmer's Market

I try to be a considerate parental unit and always knock if their door is shut. Well, and quite frankly I don't want to see what might be going on behind that closed door. When no one shrieked "Aaaack! We're naked!!!" I opened the door and without preamble or pretext I blurted out "Do you have any condoms?"

They had that deer-in-the-headlights look goin' on. Quickly, I added "Uh...I'll give them back..." Now they were MOOSE-in-the-headlights. "I'm not going to USE them." I don't know what's bigger than a moose...let's switch species and go with wooly-mammoth-in-the-headlights. Clearly, they were having trouble processing so to add to the confusion I said "And do you have that tea wallet I made you handy?" I think they were numb at this point. Autumn reached into the night stand and threw a handful of condoms in my general direction and mumbled something about a basket on the dresser, where I found the tea wallet. I think they just wanted me OUT of the room so they could discuss assisted living options for me.

Safely back in the "sewing area" (which is most of the rest of the house), I slipped the tea out of the tea wallet pockets and replaced them with condoms. Ta Da!
With Tea Paraphenalia
Well, almost Ta Da...condom packets are a teensy bit smaller than tea packets, so I mentally calculated about a half-inch difference in the final measurements I would need.  

Tea Packets vs. er...uh...CONDOMS!

I always use this tea wallet tutorial with a few of my own modifications. For my new creation, I shortened the four 5" x 7" pieces to 5" x 6 1/2". I chose a few pieces of fabric, started cutting, and barely 30 minutes later, I had two "Condom Wallets" for two friends who had July birthdays. I was going to see them both later in the day, and since they are very fun-loving ladies, I knew they would appreciate my slightly off-color gifts.


By this time, the kids had somewhat recovered from their mom/condom shock and were heading into town for some grocery shopping. I tempted fate and asked if they would mind picking me up a box or so of condoms. Oh, and PRETTY condoms would be a real bonus, please and thank you! I showed them my empty but finished wallets and handed over twenty bucks as I shooed them out the door. While they were gone, I fancied the wallets up a bit with some charms and beads.

Those kids really got into the sprit of the task and came back with three boxes of assorted colors AND flavors! Banana, Cherry, and Lime, Oh My!

Plus a couple of "surprises" listed on the box below...we won't discuss those in polite company but they fit nicely in the wallets as well.


I loaded up the wallets and admired my handiwork. Later that evening, my fun-loving lady friends were absolutely thrilled with their quite useful gifties. I guess next time my mind wants to wander, I should send it off with my blessings and a no-limit mental credit card and wait to see what it brings back.

Tuesday, June 28, 2011

Raspberry Ketchup Luggage Tags

I'm sure you are wondering what Raspberry Ketchup Luggage Tags could be about? I know it's a strange name, but bear with me - I do have a reason why I'm calling them that. But first, let's talk about food! I'm sure you've all seen sites like allrecipes.com where you can find not only recipes, but ratings and reviews of those recipes. I love these sites and take advantage of the reviews to determine whether or not I might like to invest my time making the dish, and to see what pitfalls or improvements I can glean from the reviewers' experiences. BUT...invariably, there are those who give a recipe a half-star and say something like this:

"I thought this was just awful! My dog wouldn't even eat it! A waste of ingredients - I threw it in the garbage!" And THEN they say: "And I followed the recipe exactly, except that..." 
  • "I added mushrooms instead of pecans."
  • "Instead of French bread, I used onion rolls, I left out the cilantro, omitted the mustard, and added feta cheese."
  • "I didn't have any heavy whipping cream, so I used non-fat yogurt."
  • "I used non-fat cheese, not-fat sour cream, substituted olive oil for the butter, and cut the sugar down from 1 cup to 1 tablespoon."
  • "I was out of raspberries, so I used ketchup instead." (on the theory that they are both red?????)
Ok, Ok...I admit it. I made up that last one...chuckle...but some of them just leave me scratching my head! If you leave out or substitute half the ingredients, you can't say the recipe stunk BECAUSE YOU DIDN'T ACTUALLY MAKE the friggin' thing!

Having said that...it's far easier to "do as I say, not as I do." I found a cute idea for luggage tags in the Summer 2011 issue of BH&G's Quilts and More (love that magazine).

I decided to make it "exactly as shown" except that...
  • I used pieced jelly roll strips instead of one solid piece of fabric.
  • I substituted a regular, large snap for the magnetic snap.
  • I printed my own personal info on ink jet printer fabric sheets instead of iron-on transfer paper using their template.
  • I used non-fusible batting instead of fusible, and skipped the interfacing.
Uh...just a FEW little changes...and here's what I produced:


Closed

Open
  Cute! But, as I fondled and played with it a bit, I observed that with only the one snap (and it would have been the same with the magnetic snap as well), the corners tended to flop down and I wondered how that would work in the airport baggage-handling craziness of rolling belts and burly baggage tossers. So I grabbed my seam ripper and snipped off the snap pieces, replacing it with a strip of Velcro all the way across. MUCH better, and much more secure!

Then I looked at my new masterpiece some more, and thought about where I would actually PUT the tag on my luggage. The swivel hook would need somelthing to hook onto and the business end of my hook was a bit FAT (maybe it needed some of those non-fat substitutions those reviewers mentioned above!). I grabbed my large "checked baggage" bag, as well as my smaller carry-on, and examined them both. One had a somewhat suitable orifice for the swivel hook, but the other would have flopped around too much and seemed likely to get caught on something. Hmmm...then I thought...the airlines use long, sticky strips of plasticy-papery stuff to put the 3-letter IATA (International Air Transport Association) airport code on each piece of checked baggage to they know which airport the bags are going to, such as SEA, LAX, etc. Of course, for the VERY FIRST TIME IN MY ENTIRE LIFE, I had actually REMOVED the sticky strips from my bags when I got home from my last trip, so I can't show you a picture, but I think you know what I'm talking about.

Anyways, I decided to use that model to fashion a different type of tag. Here's a "before" picture of my largest bag. Hot pink ribbon, so I can spot it easily, and my info tag was hastily conjured up using an old French Laundry clothing tag - hey, it's "green" isn't it?

And "after" - my oh-so-pretty, secure-from prying-eyes new luggage tag - a long, skinny tag with a couple of strips of Velcro. Again, I used homemade 2 1/2" strips, but this time I used two lines of Velcro - one at the very ends, and another closer to where it wraps around the handle - with the personal info label in between.

Open, I used two sets of Velcro


I like them both, but neither is all that much like the Quilts and More pattern I originally set out to make. So I dubbed them "Raspberry Ketchup Luggage Tags," in honor of my made-up review above :-)

I guess you could say it's much ado about nothing...you can get those free labels right at the airline counters. But of course, if a sewist can fashion something - ANYthing! - out of cloth, we will! And if it's pretty, so much the better! Hmmmmm...I wonder if I should make one with ruffles? Ball fringe? Prairie Points? Yo-Yo's, anyone?

Monday, June 13, 2011

Hippie Chicks Chicken Coupe!

After I retired last fall, I made some squawking noises about wanting some chickens. I even found a pattern for a cool movable chicken coop that hubby could build. Everyone here thought I was nuts, so I kinda-sorta gave up the idea for the time being. However, younger son, Adam, must have had chickens on the brain all winter because a few weeks ago he decided to convert an old "hippie" van to a chicken coop and got 10 chicks from a friend. I know our neighbors are trying to sell their house, which is a 2.2 acre chunk of our now 37 acre property. Fortunately you can't quite see the "Hippie Chicks Chicken Coupe" (coupe - pun intended) from their house to ours. Here's Adam using his "new" dozer to pull the old van out of the bushes where it's lived for the past 20 years or so after it quit running.
My...doesn't it look nice? See the decorative moss? And doesn't Adam look proud of himself? 
Can you believe we were able to buy this van that included this fabulous artwork for no extra cost? The art alone was worth what we paid for it way back when - a couple hundred dollars, I think ;-) It used to have phsychedelic mushrooms painted on the outside too, but I guess they all faded or washed off over the years :-(
Building the nexting boxes
Cute little chicken ramp
A nice chicken "blind" on one side - open for sunny days and closed for dismal ones - gotta keep those Hippie Chicks Happy!
I'm not so much feelin' the free love here on the back end - looks too much like a prison van!
And a couple days later, here come da Hippie Chicks! All hap-hap-happy in their new Hippie Chicks Chicken Coupe!

And Adam's GF, Katie, did some awesome art work on the chicken blind...
Ohhh...it's bringing the 60s back to me...Sky River Rock Festivals and all...sorry, new prospective neighbors, but when you move to the country, it ain't gonna be like the city...PEEP PEEP!

Saturday, June 11, 2011

Baby Quilt + Extras

Even though I do a lot of "quilting," this is actually the first QUILT I've made in quite awhile. I much prefer smaller (can we say instant gratification!) pieces like tote bags, wall hangings, or piecework incorporated into aprons, potholders, pouches, etc. But a baby needs a quilt :-) so here's what I came up with. (Thanks, Ben, for being my quilt mannequin!)
Front

Back

I decided on the three dot fabrics I'd used in the quilt (purple, green, pink) for the binding, mostly because I was too lazy to find some other fabric that might have made it pop more, but the dots do look nice, I think. Of course wouldn't you know, I ended up with a seam in TWO of the FOUR corners! Oh well...

I used scraps to make this matching bib, which I think turned out really cute.

I used a smaller version of the quilt block for the bib.

Bib Back


All washed/dried/crinkled and wrapped up ready to go to the lucky (in my opinion!) baby. Since those Fabric Sheets for Ink Jet Printers are my new BFF, of course I had to make one!

I combined a poem with some appropriate baby clip art. I also inserted a Text Box in my Word doc so that I could make the background a pale pink, instead of the plain white fabric of the fabric sheet.


"Tiny Fingers, Tiny Toes, Rosebud Cheeks, Cute Button Nose"


Friday, June 10, 2011

Card Wallet Tutorial

I included my vesion of a card wallet in my Sew Mama Sew Giveaway package, so I decided to do a tutorial on it.  I've been using this version for many, many years to store my debit and credit cards, loyalty and punch cards, driver's license, and a book of stamps. You probably use yours for different things or maybe just the loyalty cards, but I like to keep the contents of my purse in several different "containers" on the theory that if someone thinks they are going to swipe my "wallet," they won't get my I.D., cards, checks, AND cash all in one attempt.


Yes, lots of people have tutes for these. Here's why mine is a little different, AND why it works (at least for me!). All others I've seen have some sort of button-and-loop closure. Mine uses Velcro. And here's why I like the Velcro better.

 
When I'm at the checkout counter at Safeway, I'm almost always juggling several reusable grocery bags, my grocery list and pen, any coupons I might have, my car keys, my Starbuck's Venti-Black-Ice-Tea-No-Syrup-No-Water, and my purse (which has my cell phone sanely tucked in a pocket - I don't do cell phone in the checkout line)...all while I'm trying to offload my groceries onto the roll-ey belt thingie and not hold up progress like the white-haired lady who waits until the the very end to even START writing her check which she does at the speed of a snail (or slug, which is what we have more of here in Washington).

Getting my debit and loyalty cards out at the same time doesn't need to add another jiggle in the juggle! I can pop my card wallet open with one hand, instead of trying to unloop the loop off the button. Ok - it's just a tiny thang...but even ONE less teeny bit of stress is a good thang, especially when the electronic display shouts $186.53  - how on earth did that tiny basket of groceries wind up being that much!!!!  :-)

 
Anyhoo...this is how I make my card wallet. The supplies you'll need are:
 
  • 3 - 10 1/2" x 5" fabric - one quilters cotton for outer fabric, one coordinating quilters cotton for lining, and one cotton flannel (you can also use cotton batting, but I prefer the thinner flannel for this project)
  • 1 - 2" piece of 3/4" sew-in hook-and-loop fastener (Velcro) 

 
If you want to add decorative details like I did on this one, you'll need:

 
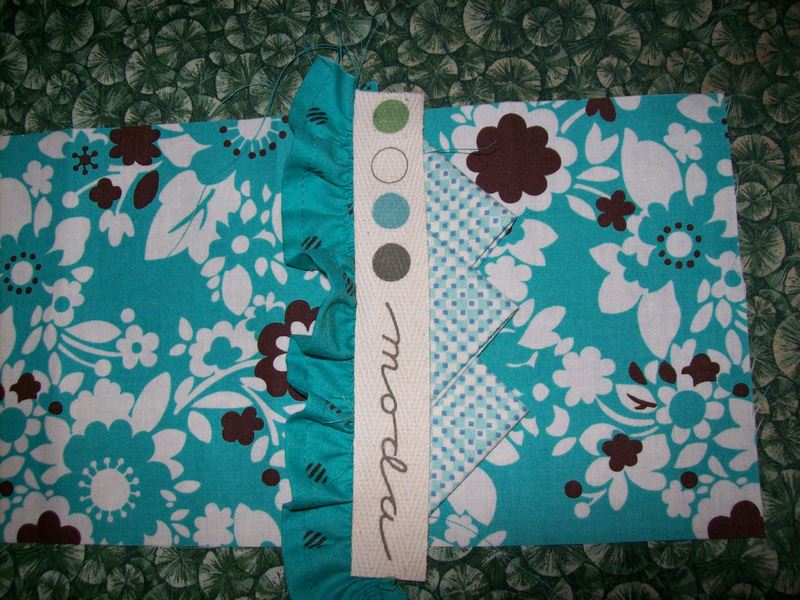
  • 1 - 1 3/4" x 10 1/2" strip for ruffle
  • 1 - piece of decorative twill tape about 5 1/2" long - or you could use a 1 3/4" x 5 1/2" strip of coordinating fabric
  • 3 - 3" squares for prairie points

I add different decorative details depending on my mood, including beads, charms, small pieced bits, etc. Use your imagination! Just be careful about placement.

Begin by making your prairie points, if desired. Fold and press as shown below - I folded mine point-to-point, but you can fold them edge-to-edge as well. Arrange them however you like, making sure the total length doesn't exceed a scant 4 1/2", and baste across the bottom using a scant 1/4" seam. Set aside.
Create the ruffle, if using: Make a narrow hem on one long side. Stitch two rows of basting stitches on the opposite long side.
Gather the ruffle strip, leaving about 1/2" on each end ungathered (this makes it easier to layer your decorative elements). Using a marking pencil, make a line about 4" from one short end of your outer 10 1/2" x 5" fabric piece.

Layer the decorative elements: Align the raw edge of ruffle to the left, along the marked line (let the ungathered ends spill off the fabric edge). Pin or baste in place.
Butt the raw edge of the prairie points up the the edge of the ruffle. Pin or baste in place.
Center the twill tape over the ruffle/prairie points. Stitch along both long edges, through all layers.
(If you are using a fabric band instead of the tape, fold the band WST, matching long edges; press. Lay the band along the ruffle, matching raw edges. Stitch. Fold the band to the right, covering all raw edges. Stitch along the folded edge. You could also use a fabric tube for this, jumbo ric-rac, etc.)
Layer your outer fabric and lining fabric, RST. Layer the flannel on the bottom. Make sure all edges are even. 

Pin all the way around.
Stitch, using a 1/4" seam allowance. Leave a 2" opening on one long side, avoiding the decorative elements. I left my opening where the lavendar pin is in the picture below.
Trim off any decorative element edges, and then clip the corners. Cut across the corners, close to the stitching, then again at an angle, as shown in the picture below - this helps to avoid bulk when turning right side out. 
Turn right side out through the opening. Push the corners out using a Bamboo Point Turner/Creaser or your favorite tool. If I had my way, every sewist would have one of these! Press well.
To create the pockets, flip the fabric sandwich over and fold the short ends in towards the inside center, leaving about a 1/2" gap; press.
Pin the Velcro in place, about 1/4" from each folded edge (be careful not to catch the back inside of the pocket). Open the wallet out flat, and stitch around each piece of Velcro. Fold the wallet back together and stitch along each long side, very close to the edge.
That's it! You're done!
Load 'er up, and go shopping!
As I said earlier, get creative and add your own favorite features. Here's the one I'm currently using in my purse - I added a fabric band, a charm and some beads.