

But since we are past Christmas, I decided to change it up a bit for a Valentines Day approach. I love these package tie-ons because they add a lot of dimension and movement!
 |
| They add a beautiful 3-D appearance to any package! |

This is an easy, no-sew project that takes just a few, easily-obtainable supplies. If you're crafty, you probably already have many or all of these already! Here's what you will need:

- 3 coordinating fabrics - fat quarters work great
- Fusible web - Pellon or Heat n' Bond, for example
- 2 or 3 sheets of cardstock in coordinating or neutral colors (8 1/2 x 11 or 12 x 12)
- 4 large-ish beads, at least one should coordinate with your fabric
- Pearl cotton or 3 strands embroidery thread to coordinate with your fabric
- Doll needle or needle large enough to accommodate your thread AND pass through your beads
- Narrow ribbon
- Pencil
- Iron
- Scissors
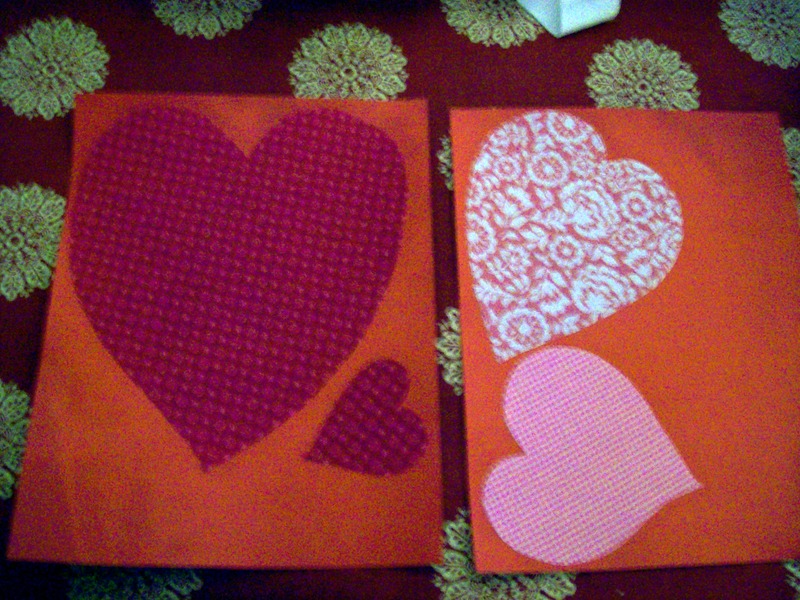
Let's begin! Again, because it's close to Valentines Day, I'm using hearts for my shape. But for other occasions, any shape could be used - mostly I've used stars. Circles? Squares? Hexagons? Cars? Dinosaurs? You're only limited by your imagination!
The size of the shapes will be determined by the size of the gift you want to decorate. Because I have a "large" (ahem) supply of 8 1/2 x 11 cardstock, I try to stick to that size for the largest shape. But if you have 12 x 12 cardstock, you could increase the size. If you want to decorate a REALLY big package, you could use posterboard or use small strips of fusible web to connect sheets of cardstock to whatever size you want. I've done this, and it works really well.
Today, I'm going to stick to 8 1/2 x 11, and to help me work within those parameters, I'm going to mark my fusible web to those dimensions. Not necessary, but helps to prevent over-drawing your largest shape.

Use a pencil to quickly hand-draw - don't over-think it...you can always smooth out your lines before you fuse and trim! Or, you could use a template, snag a shape from the Internet, or use Shapes in your word-processing program, etc. When you're happy with your drawing, smooth/straighten your lines, if necessary. Draw a smaller identical shape, and another smaller than that. And, just because, I added a fourth heart to fuse directly to the smallest heart for contrast. Here, I've contained my desired three smaller shapes within a second 8 1/2 x 11 area.


Fuse the webbing to the back of your fabrics. Cut out the shape on the drawn lines. Before you cut, you may wish to peel back one small corner/area in order to make removing the paper backing easier.
 |
| Notice my pretty NEW ironing blanket I made! My old one was in complete tatters! |
Iron the fused fabric to the cardstock, and trim the cardstock even with the fabric edges.
 |
| Tip! At this time, you may wish to save your "templates" so you can easily recreate (trace) them without redrawing! |
To make the stack, thread the doll needle with your pearl cotton or 3 strands embroidery thread. Pass the needle through your bottom bead (leave a 3" tail), then through your largest heart, from back to front.

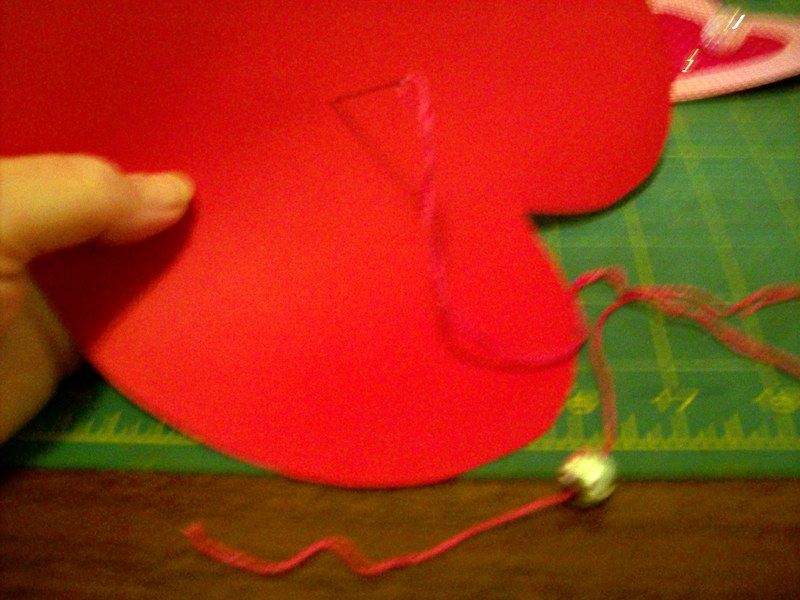
Add your next bead, and thread through the back of your middle heart, add third bead, and thread through the back of your smallest heart.

Add the fourth bead, then drill back down through the stack EXCEPT for the bottom bead, leaving a 3" tail. I drill down about 1/4" away from the first holes; farther apart if you need to keep the shapes more closely aligned, like these hearts, so they don't swing completely around. Note: I did add a small E bead to the top of my uppermost bead because it was quite large; if your bead is smaller, you can just go directly around the bead and down through your top shape. Carefully but firmly pull your threads to eliminate any slack, then tie the thread ends in a double knot around the bottom bead.


To attach your stack to your package, cut a 14" length of narrow ribbon. Tie the ribbon around the bottom bead, between the bead and the bottom heart (tie a loose knot in the ribbon, then slip it over the bead). Use this ribbon to tie the stack onto the ribbon on your package. Leave the ends sticking out, or cut them off, as desired.

Tie the stack onto your package ribbon, criss-crossing and cinching the ribbon.
Grab your package and shake it a bit! Admire how the hearts wiggle!


