Saturday, September 7, 2013

Favorite Things Swap

It has been a long, dry spell between swaps for me, but I finally signed up for Shawnee's Favorite Thing Swap! We were supposed to send at least three of OUR favorite things - and that could be anything...a kitchen tool, a sewing notion, a yummy treat, or even an apron :-) They could be all handmade or all store-bought! My partner, Mary Lea of Wyoming, sent me this fabulous package! I was so excited and she wrapped it with a lot of care and love :-)
See all the cute little number tags? She had sweet little messages on the back of each of them!
And here's what was IN all those sweet little packages!
Mary Lea sent me two projects to work on: some towels to embroider and a cute pattern to make. Some yummy looking salsa fixins and an awesome individual salad dressing container. Look at those cute cookie cutters! I love the ribbon and baker's twine - you can't ever  have too much of either :-)  Some Bath & Body Works hand soap and a bar of soap that smells really good. A ceramic owl and owl stickers. Oh, and the packages were wrapped with owl ribbon! What a haul! Thank you, Mary Lea! 
 
And here's what I sent to my partner, Jeannie! One of MY favorite, kinda new things are "hexies" or paper-piecing in general. I didn't think I'd like paper-piecing until I tried it, and now you can't stop me! So when I found this tutorial from the Zen of Making blog here: http://www.thezenofmaking.com/2013/08/tutorial-english-paper-piecing-travel-kit-hexies-part-3.html, I just knew I had to make one for this swap. It looks complicated, but was remarkably simple to put together. There's a LOT of hand-sewing though, just a warning if you don't like to hand-sew (I love it!).  
And here it is open, and filled with goodies:
 
 The empty Altoids tins make perfect hiding places for a stash of the paper shapes, and a cute little sewing kit, including a magnetic felt pinkeep. A pair of scissors and several fat quarters complete the kit so she can start right in making hexies. Or, if paper-piecing isn't her thing, she can use it for a regular sewing kit.
Now I need to make one for myself!
And here's the rest of what I sent her...another of my favorite things are the Clover Wonder Clips - don't know how I managed before these! I sent her the "regular" size, but I love the jumbo ones, too. Also, a bamboo point turner and presser - I could NOT sew without one of these for those nice sharp corners and points! Some Thread Heaven and a box of flat-head pins. Some addictive Trader Joe's chocolate-covered caramels, and of course I had to include one of my Shoop-Shoop Bags - I added a few hexies and some images of sewing machines, using printable fabric sheets - she said she liked anything with sewing machines on it. I hope she likes her package as much as I liked the one I got :-)


Sunday, August 25, 2013

World's Fastest Suitcase-Make!

Took a little 3-day trip to Victoria, BC with the hubby and oldest son, Ben, his wife, and our precious g-daughter, Aubrey. We took their car, which does have a big trunk, but we had to stuff a stroller as well as a walker in it, so space was at a premium. I decided I *needed* to make a soft-sided suitcase thingie for my clothes, as it would slide into the empty spaces around the stroller/walker more easily. Well, and also...any excuse to sew something, you know :-)

But it had to be F-A-S-T!!!!! Because I waited until the afternoon before the trip, AND we were leaving at 4:00 a.m.!!! So I worked out this little idea and let me tell you - not only was it the World's Fastest Suitcase-Make, but it also worked EXTREMELY well. At first, the family was laughing and calling it my "pillowcase suitcase" but it didn't take long for them to change their minds - even hubby commented several times on how well it worked!
Overall dimensions are 20" x 17" x 4" - more than enough room for clothes, shoes, and toiletries for a 3-5 day trip.
I used just 3/4 yard of two fabrics (exterior and lining), and 4" for the handle, plus a 24" zipper. I added fusible fleece to the exterior and fusible interfacing to the lining. I was in a hurry (and wasn't quite sure of the anticipated result!) so I didn't take any pictures for a tutorial, but I like it so much, I'm going to make another one and I WILL take pics to share the process!

Here it is with the zipper open...
One zipper...two seams...and a strap! Couldn't be easier or faster!

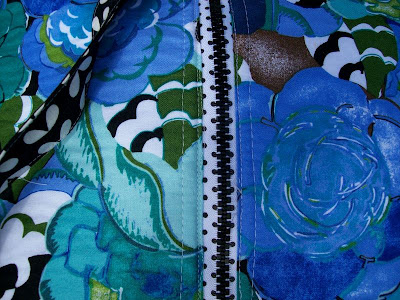
Close-up of the cute zipper...
See the cute polka-dot zipper? :-)

I boxed all four corners to give more depth. Here is one short end.

And the long side.

I made the strap a few inches longer than the bag so that I could get into the bag easily. I wanted to make another, flat strap to go on one long side, but decided I was running out of time since I had to get up a 2:30 a.m. The bag fit perfectly on the suitcase caddy in the hotel, and it was super easy to carry slung across my shoulder/back, too! Whenever the family is impressed with something I made, then I know I done good ;-)


P.S. Hubby said "And you used fabric from your stash, too...right?" I said "Define *stash*...how long do you think fabric has to be in the house before it becomes stash? One month? One day? 15 minutes?"

Sunday, August 11, 2013

Jumbo Wonder Clip Pacifier Leash


This kids needed a Binky leash the other day, so I decided to whip one up. Even though it's a basic, easy-to-create item, I looked for tutorials anyways. The ones I found invariable used the suspender/mitten clips. I knew I had a package of these clips *someplace* but being lazy, I didn't want to look for them, and besides, I know they are kind of a pain to quickly clip on and off (your shirt, blankie, car seat). So I started looking around my sewing machine area and found a stray Jumbo Wonder Clip! I snatched it up and, sure enough - there was a hole in one end! I quickly whipped up a leash! It was cute and we left for an outing soon after. I sat in the back seat with Aubrey and she kept playing with the leash. She also had a little toy attached to the carseat that was a triangle of plush fabric, with the popular folded ribbon detail. I decided to combine the two ideas! So I made a second one this morning, and here's the result!
Want to create your own? Here's what you need:
  • Two strips of fabric, 1 1/2" x about 16" (length is your choice)
  • Two coated elastic hair ties
  • Ten to fifteen 2 1/4" lengths of ribbon (grossgrain or other sturdy, washable, non-wired ribbon)
  • One Clover Jumbo Wonder Clip - you can purchase these from many sources, including this one: http://www.sewthankful.com/Jumbo-Wonder-Clips-Clover-3157.html
  • Thread, sewing machine, rotary cutter/mat/ruler

Fold each piece of ribbon in half and pin them to the long sides of one fabric strip. If you've followed  my cutting requirements, the ribbons will be short enough so they won't get caught in the opposite seam when sewn.
Place the remaining strip, RST, on top of the first strip and pin in place. Fold the short ends of each strip under 1/4" and pin in place.
Sew both long sides, using a scant 1/4" seam allowance (do not sew across the short ends). This will prevent the folded edges from catching in the opposite seam. Using your favorite turning tool (I used the old, trusty standby - a safety pin), turn the tube rightside out, and press.
Grab your hair ties. If they have a metal connector, cut it out for safety's sake. If they don't have a metal connector, you can leave them in one piece, fold in half, and insert the ends inside each end of the tube, with the hair tie sticking out to the desired length. I threaded one hair tie through the Jumbo Wonder Clip before I inserted it into the tube, and left the other hair tie sticking out a bit farther so I could maneuver the pacifier through the loop after-the-fact, since you might want to change pacifiers. 
 
With the hair ties in place, edgestitch all the way around the leash. Loop through the pacifier, and you are done!
My hubby suggested you could use ribbon instead of fabric for the leash. Yes! You could! I might have to make one like that just for the heck of it!
 
I LOVE the Clover Wonder Clips -both the regular and the jumbo. I use them all the time instead of pins - no more poking my fingers! I'm glad I thought of this new way to use them :-)  I think, especially when attaching your leash to a car seat, these clips just make it so much easier than using the suspender/mitten clips. Why not give it a try?
 

Tuesday, July 23, 2013

Some Birthday Gifties

I had lunch with some lady friends today, and we celebrated all our birthdays - from May, July (mine!), and August. We exchange gifts each year for birthdays and Christmas. This year, I chose to make them each a plastic bag dispenser in some really pretty pink and green fabrics, and I tossed in some gray just for fun.
I used the Moda Bake Shop Grocer Bag Dispenser pattern, but added 1 1/8" lattice between 4 1/2" squares: http://www.modabakeshop.com/2009/06/grocery-bag-despenser-tutorial.html.

I also whipped up a couple of hot pads:

And a couple of my Shoop-Shoop Bags. I added some hexi fun!
I have soooo many hexis just waiting to be applied to something! Maybe I'll work on those today :-)

Monday, July 1, 2013

A Sweet Surprise :-)

I got such a sweet surprise in the mail awhile back. Sometimes, when you are your lowest, little things happen to bring you a moment of joy and remind you you're not alone. My husband was diagnosed with pancreatic cancer, after a very long period of tests and frustration at what they WEREN'T finding. Yes, the diagnosis sucks. But now he is feeling much better with dietary changes and meds. Chemo also sucks, but is really not so bad, because he is pain-free and still able to enjoy life.

Back to the sweet surprise. Way back when...I was SUPER-LUCKY enough to land on Charise Randall's blog, Charise Creates: http://charisecreates.blogspot.com/ JUST at the right time to wrangle a spot on her Crafting it Forward post. I was the 5th (of 5!) to chime in, just under the wire!

Quite honestly, I forgot about it fairly quickly...and time passed. Then just a couple weeks ago, I received an email from Charise saying my goodies would be in the mail! I was so excited! Like a little rainbow-y sunbeam from out of nowhere :-)

And a few days later, a package arrived in the mail, just a few days after we had received the diagnosis. I tell ya...opening that big metal, rural mailbox and finding a package addressed to *ME* made my giggle like a schoolgirl!

Ok, I didn't snap a pic of the package...but I DID manage to restrain myself long enough to get one of the wrapped gifties - and you can be sure I saved that baker's twine, yess-in-deed-y!

And lookee what was inside! A cute little notebook that's going in my purse as soon as I make a little pouch to put it in so it doesn't get all scruffy and pursified. Look at that lovely FQ! One of my favorite colors is aqua! And the potholder...the potholder...will NEVER "know" a pot. Sorry. It just won't. Can't bear the thought of getting that pretty hotpad dirty or worse yet, burnt! It's hanging on my fridge right now :-)

I can't begin to tell Charise how much that little package meant to me - she was lamenting that it took so long for her to fulfill her "forward" but honestly, it came to ME at just the right time :-) It made me smile and lifted me up. Thanks so much :-)

And I will be putting up my own Crafting it Forward post within a week, and the first five Commenters will get some little package from me within the next 9 months, so watch for it!

Now...what shall I make with that FQ?????

Wednesday, May 29, 2013

Diaper Changing Pads

My son and DIL asked me to whip up a few new diaper changing pads for our dear, new grandaughter, Aubrey. How could I say no? :-)
 
We determined a good size for now is 26" x 16" with rounded corners. I used cotton quilting fabric, and backed it with Sew Comfy (JoAnn's), and added a layer of PUL inside to make them waterproof. That way, I could have a pretty fabric on one side and a soft fabric on the other side, and still have them baby-poop/pee-proof :-)
 
I used some strips of exam room paper (gift-wrap tissue would work too) against the PUL when I sewed the layers together to keep the PUL from sticking to the sewing machine plate. Then turned the sandwich out through a 3" opening, and topstitched the finished pad.
 
I love the "Just Stay Little" saying on this fabric...oh, if they could just stay little a little longer :-)
 Miss Piggy photo-bombed my pic!

Sunday, May 5, 2013

"Carbage" Bag and Organizer, Part Two

My son Adam's girlfriend, Lisa, asked me to make a couple of organizers for her car for a trip they were taking. You can see the "carbage" bag I made in the previous post. This was the other pattern she picked out, and it was a bit more complicated, but I spent only one day cutting out, and one day plus about an hour this morning on the sewing/finishing. So all in all, that's not bad.
 
Here's the organizer view from one side. Includes a large pocket and pencil pocket.
 
Again, I used the Kate Spain Park Central for Moda fabrics I already had in my stash. The Craft Apple The Car Organizer pattern: http://www.craftapple.com/3-the-car-organizer-pattern.html called for just two fabrics, but I do like to really mix it up, so I used LOTS! The pattern has full-sized patterns for all pieces, as well as dimensions if you chose to rotary-cut without the paper pattern pieces. They had alternate layout instructions for one-way fabrics, but not for the interior pieces, so my trees wound up laying on their sides. Oh well...at least their shipping was fast-fast-fast, since this is not an instant-gratification pdf pattern :-)


This pattern called for Pellon SF101 interfacing and either Peltex 71F or htc Flexi-Firm stabilizer. I did some research and lots of people actually recommend Decor Bond 520, however my JoAnn's didn't have the Decor Bond, so I went with the Peltex. It worked quite well. This bag is extra-sturdy, since several of the stablizer inserts are doubled.
 
 
End showing seat belt flap, closed.


And the seat belt flap, open.


Here's the interior. There's a large and a small compartment.


On either side of the large compartment, there are D-Rings on ribbons.


The D-Rings swing up over the sides and hold the handles of a plastic grocery bag for trash, if desired. Or you can skip the bag and just use the compartment for whatever you wish.


Pocket for pens/pencils and other small items.
Lisa's niece has already placed her stamp of approval on the first bag I made...wait til she sees THIS one!

Friday, April 26, 2013

"CARbage" Bag

LOL! I was trying to say "car garbage bag" out loud, and it came out "carbage bag" which is more descriptive, anyways :-) So, "carbage bag" it is!


Adam's girlfriend, Lisa, asked me to make a couple of organizers for her SUV - she and Adam are taking a little trip to Zion National Park in Utah next month. Not knowing exactly what she wanted, I compiled a list of ten car organizer items, including over-the-seat bags, divided floor box organizers, visor clip-ons, etc. She picked a box-style organizer, and this trash bag. The tutorial is from
I used the dimensions and general instructions, although I beefed it up with Pellon 950F ShirTailor and Pellon TP971F Fusible Thermolam Plus Fusible Fleece, the fleece fused atop the ShirTailor. This makes a nice, hefty sandwich that stands up nicely.


It calls for laminate fabric inside, so it's wipe-clean. I had several half-yard cuts of laminate, and I chose one for which I had the matching quilting cotton. This is Central Park by Kate Spain for Moda. I had used a bit of it for something (?) a year or so ago, but had lots left, so I thought this was a good choice and I'll be able to make the box organizer as well, since I had a Jelly Roll, four FQs, two different laminate cuts, and some half-yard and yard cuts. Just waiting for the pattern to arrive in the mail: http://www.craftapple.com/3-the-car-organizer-pattern.html and here's a pic of the pattern, from their Website. They mailed the pattern the same day I purchased it, so it should be here soon, so I'll be posting the finished organizer soon!

CRAFT APPLE PATTERN

Wednesday, April 24, 2013

A "Girlie" Basket Request

The kids asked me to make another fabric divided basket (pattern: Noodlehead), this time in a "girlie" theme, since Baby Cummings turned out to be a girl. She looks fabulous in lavendar, so I chose Michael Miller Castles in the Sky, Once Upon A Time, Kiss Dot, Mini Cupcakes, and two matching solids from my LQS.

Since they told me I could "girlie" it up, I added a sweet little lavendar ruffle across the front pocket.
 
Ben also requested a design change, and he is right! He said "Mom, when you become a parent, you lose the use of one arm." LOL! Yep, you sure do! He showed me how it was difficult to pick up the basket (with its handles on opposite short ends) while holding little Aubrey. I said "No problem!" So I lengthened the handles by about 2 1/2" and relocated them to the long sides, angling them a bit, rather than setting them in at a right angle.
 
I love the "Once Upon A Time" lining fabric! I also beefed up the center divider panel by using the fusible interfacing and fusible fleece on BOTH sides.
 
 
I used the cupcake fabric for the exterior.
 
 
I just love these baskets! I'm sure I'll be making more in the future! Now I need to whip up some matching burp cloths and washcloths - I'll start on those today :-)


Wednesday, April 10, 2013

Aubrey Reese Cummings - Welcome to The World!

My precious new grandaughter was born yesterday to my son, Ben and his wife, Autumn! 7 pounds, 8 ounces and 20" long, with HAIR! Everyone is doing just fine, and this grandma is WAY excited to have a grandaughter! I had convinced myself it was going to be a boy so I was stunned when a girl popped out :-)

A girl! Ruffles! Pink! Cute! Oh my...am I going to have fun sewing for this little cutie pie :-)


Daddy and Baby Girl.....Can I hear an "Awwwwwwww"?????


This is Aubrey's cousin, Nessa - Junior Babysitter in the making!

I didn't get a picture of mom because she was tired and not quite "properly attired" for prime time, so I'll have to post a pic of her later :-)

Tuesday, April 9, 2013

Divided Fabric Basket (Noodlehead)

I whipped out this divided fabric basket for Baby Cummings (WHO IS BEING BORN TODAY!!!!!) a couple days ago. I used this pattern by Noodlehead: http://www.noodle-head.com/2013/01/divided-basket-pattern.html.

I love this basket! I did do a few things differently (don't we all?). Because I had the Pellon ShirTailor left from the diaper bag posted below, I used that, plus the fusible fleece, for the main basket pieces - I really like the heft and stiffness of that combo. I also interfaced pretty much every other pattern piece. I really wanted this basket to stand up under the rigors of baby-changing :-)

I did have a bit of confusion over the instructions for inserting the divider (probably my fault), so I just did my own thing and it turned out perfect! I used Bungle Jungle by Tim and Beck for Moda Fabrics. Actually, my DIL, Autumn, has a thing for elephants, so I have been "collecting" elephant fabrics for months. I let her choose from  my elephant collection and she picked these. I think they are perfect for Baby Cummings :-)


I used the larger scale print for the pocket, against a multi-dot, and a yellow jelly roll strip for contrast.


The back. I used the plaid for the handles.


She chose the blue-on-white elephants for the interior.

Now all we need is Baby Cummings!